Categories
Recipes

Top 10 Tips for the perfect Gingerbread House!

One of my favourite festive holiday traditions is one that started when my oldest daughter was just 2 years old, and we’ve enjoyed it every year since – our annual Gingerbread weekend! This involves a weekend full of deliciously spiced baking, alongside a load of sweets, icing, and a TONNE of sprinkles!! It’s a fun tradition that we look forward to every year, but I know from experience that even the simplest design can end up as a pile of candy and crumbs – so if this has been you in the past (and trust me, we’ve all been there!), or if you just fancy taking your gingerbread house to the next level – then read on for my Top 10 Tips for the perfect Gingerbread House!

1. Use a template

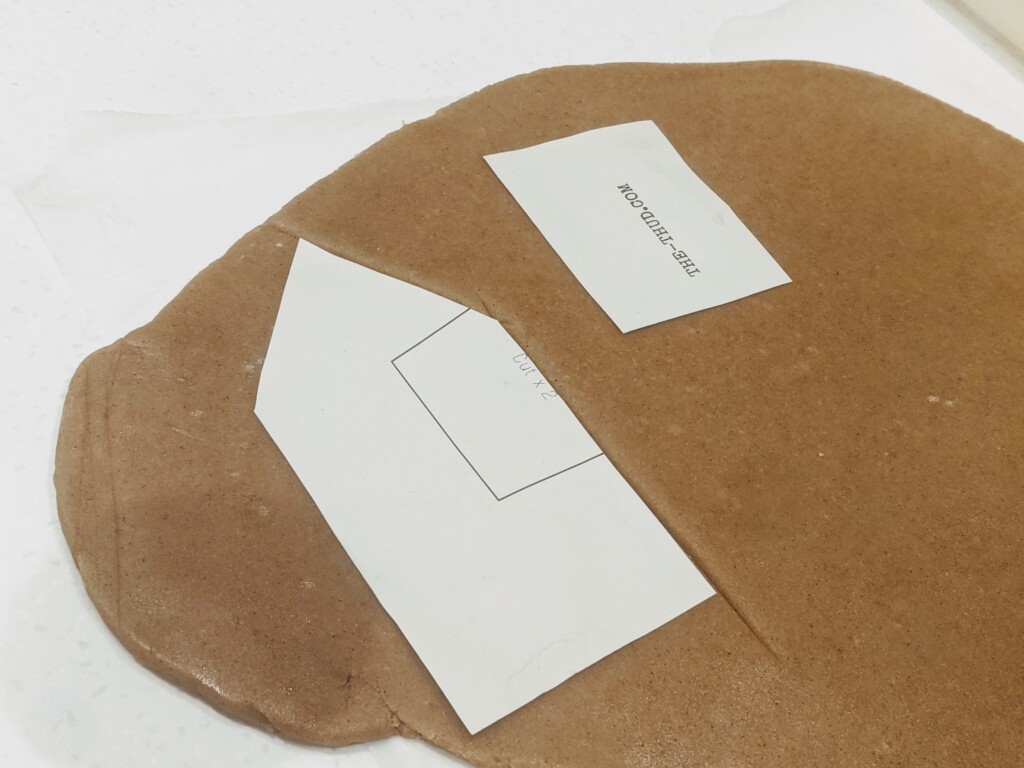
I’ve learnt the hard way that winging it doesn’t really work too well when it comes to designing a gingerbread house! So I recommend using a template to help with planning the structure of your house – there are lots of free templates available online, both simple, and more ambitious – so either print one off, or trace it off your computer screen onto some parchment paper. A quick Google search will bring up lots of examples! Then just use a pizza cutter to cut the shapes out of your chilled, rolled out gingerbread dough – et voila!

2. Use the right recipe

There are lots of yummy gingerbread recipes out there, but my favourite is one that creates a strong gingerbread wall that will withstand the weight of a roof, but that will also taste delicious when you eventually decide to eat it! This recipe from BBC Food is originally for gingerbread men, but I love using it for the structure of our gingerbread houses. It’s full of yummy winter-spice flavours (without being overpowering in taste), has a lovely chewy texture in the middle, but is still strong enough to hold together as a house – winning all round!

3. Fancy windows!

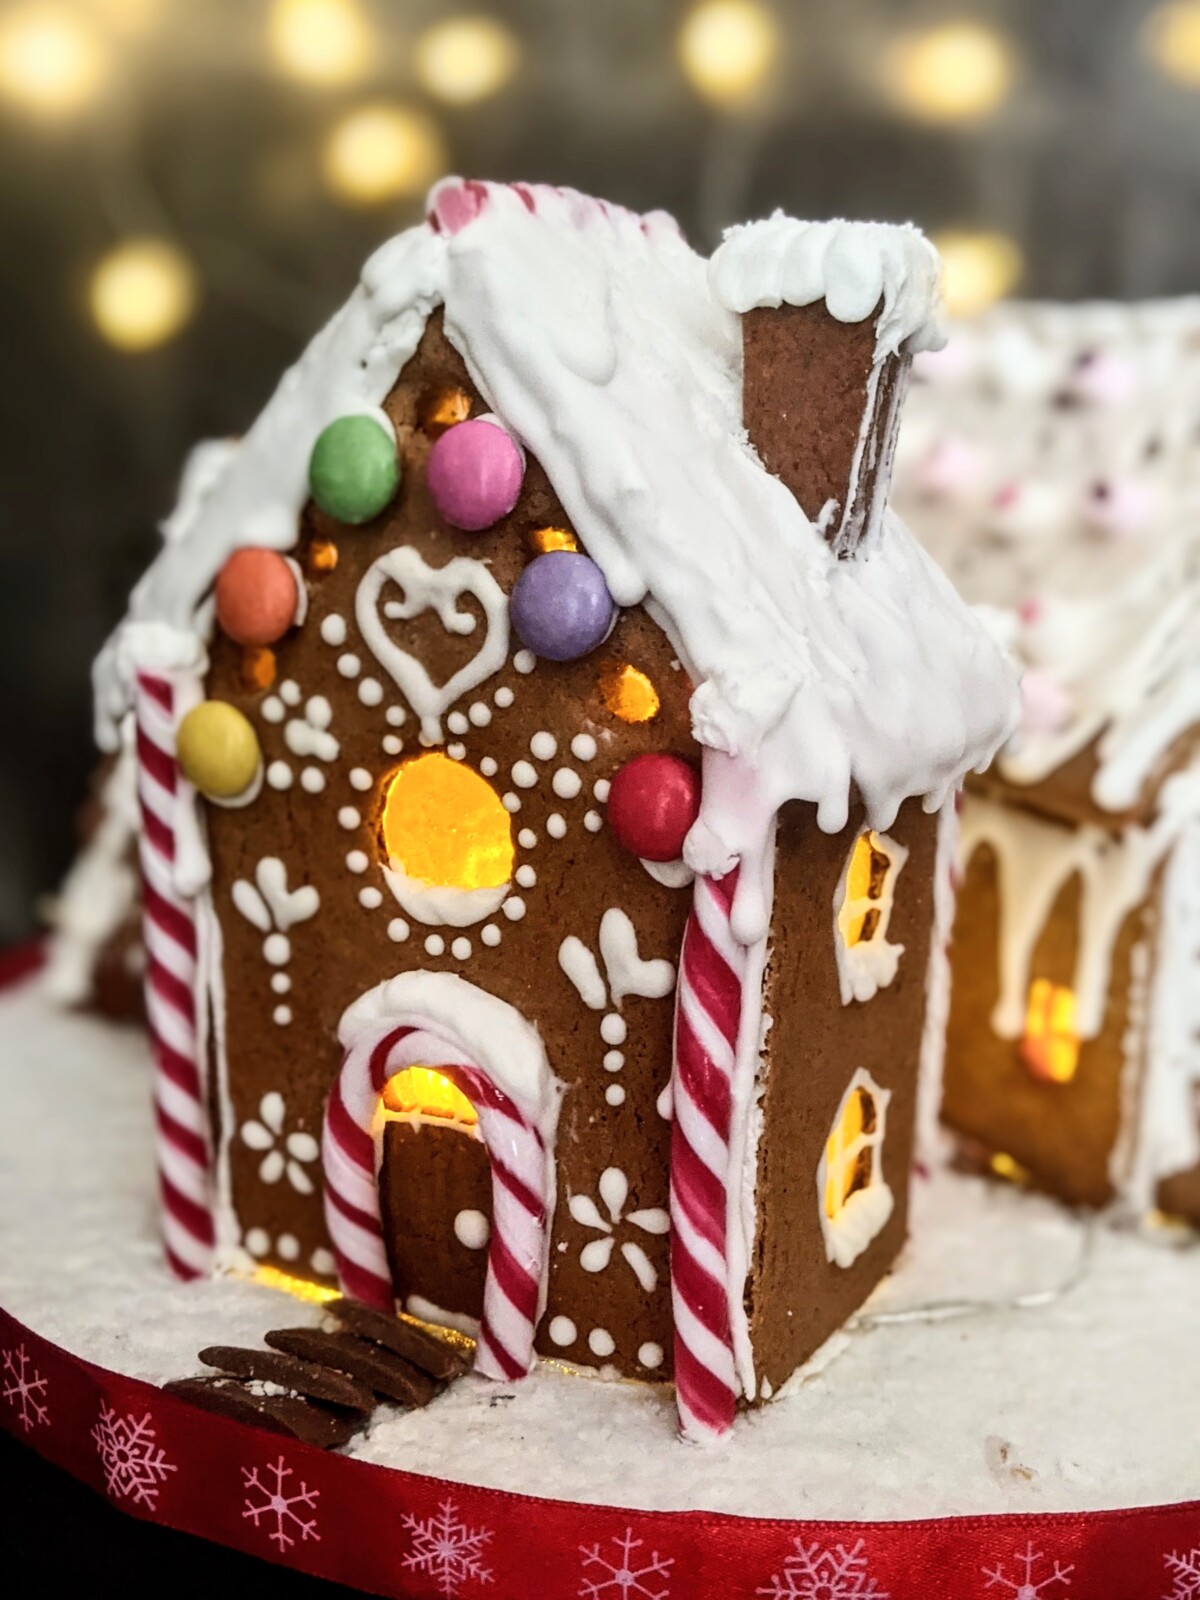
You can’t have a house without windows, so once you’ve cut your structure shapes out of the dough, carefully place them onto some parchment paper on your baking tray, and then cut out some windows! You can cut them out free-hand, or use tools that you already have in the kitchen to give them a nice neat shape, such as the large end of a round piping nozzle to give you perfect circular windows.

To give your house the extra ‘wow’ factor, use crushed boiled sweets to give your windows a special stained-glass look! Red, orange and yellow sweets work well for a warm glow emanating from your cosy winter house – 5 minutes before your gingerbread is due to come out of the oven, take it out and put your crushed sweets into the window holes. Then pop it back in the oven until the sweets melt – once it cools, you’ll have some beautiful window panes in your walls!

4. Chill your dough before baking

Once you’ve made your dough, roll it out between two sheets of parchment paper and chill it in the fridge for 10 minutes before cutting out the shapes. This will prevent it from spreading too much once it cooks in oven. However, inevitably you’ll still get a little bit of spreading around the edges (a little like my waistline at Christmas *sigh*, and so, to make sure your walls maintain the right shape to become a perfectly structured gingerbread house, you can…

5. Trim the edges of your baked structure

Most delicious gingerbread will end up spreading at least a little once it’s done baking. This can make it difficult to glue your walls and roof together, so once your gingerbread comes out of the oven, whilst it’s still warm, very carefully trim the edges of your shapes using a large sharp knife and your original templates to guide you. You’ll need to keep the gingerbread on the baking sheets so as not to break it, so be careful not to burn yourself!

If you’re not to keen on this option however, another trick is to…

6. Finish off the edges with a fine grater

This was a total game changer for me, especially for small details such as chimneys! I use a fine grater normally reserved for zesting lemons, to sand down the edges of my gingerbread once its cooled – perfect for getting those walls perfectly shaped to fit together in your architectural masterpiece!

7. Choose the right glue to hold it all together!

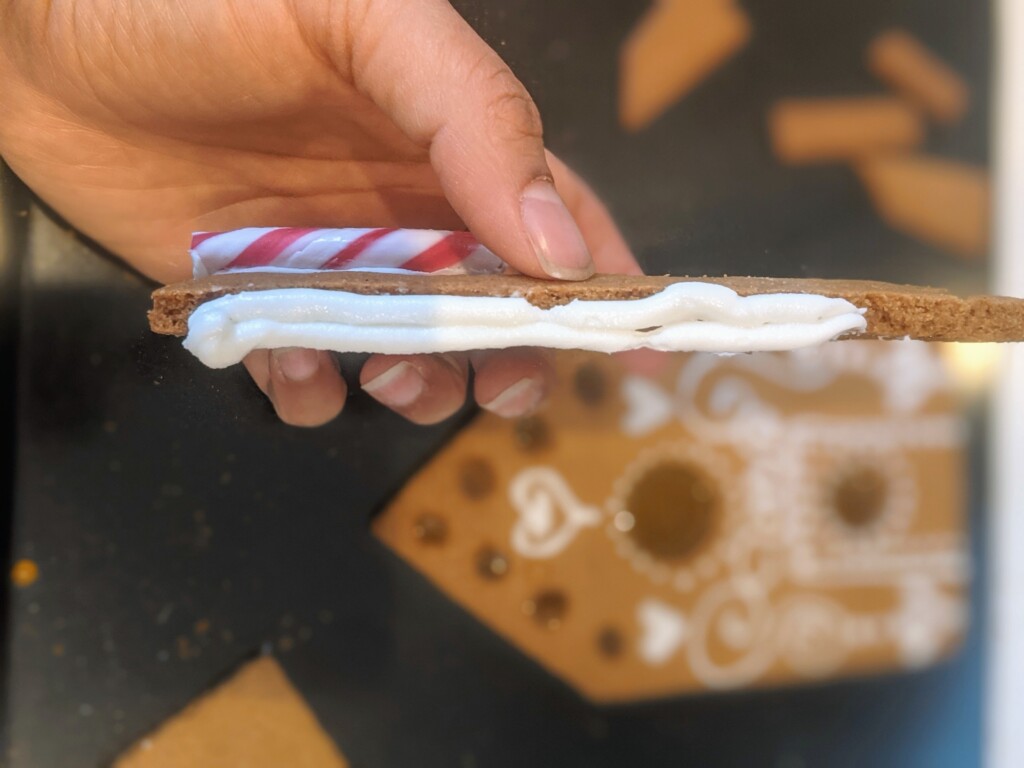
Probably the most common problem encountered with a gingerbread house is getting it to all stick together – pretty heart-breaking to see it fall apart after all that hard work getting it prepared! Your icing needs to act like cement to hold the structure together, so use a good thick mix of royal icing – it has to be a thick toothpaste consistency, which will harden up nicely once it’s been left to dry. Pipe a good generous line of icing down the side of a wall and hold the two walls together – use a sturdy prop such as a can of beans, to help keep your pieces together and upright.

If you can’t get hold of royal icing and need a substitute at the last minute, it’s also possible to make your own sugar glue by carefully caramelising a cup of sugar in a pan, stirring until it turns golden, and then dipping the edges of your walls into the pan and gluing them together.

8. Set it up on a board

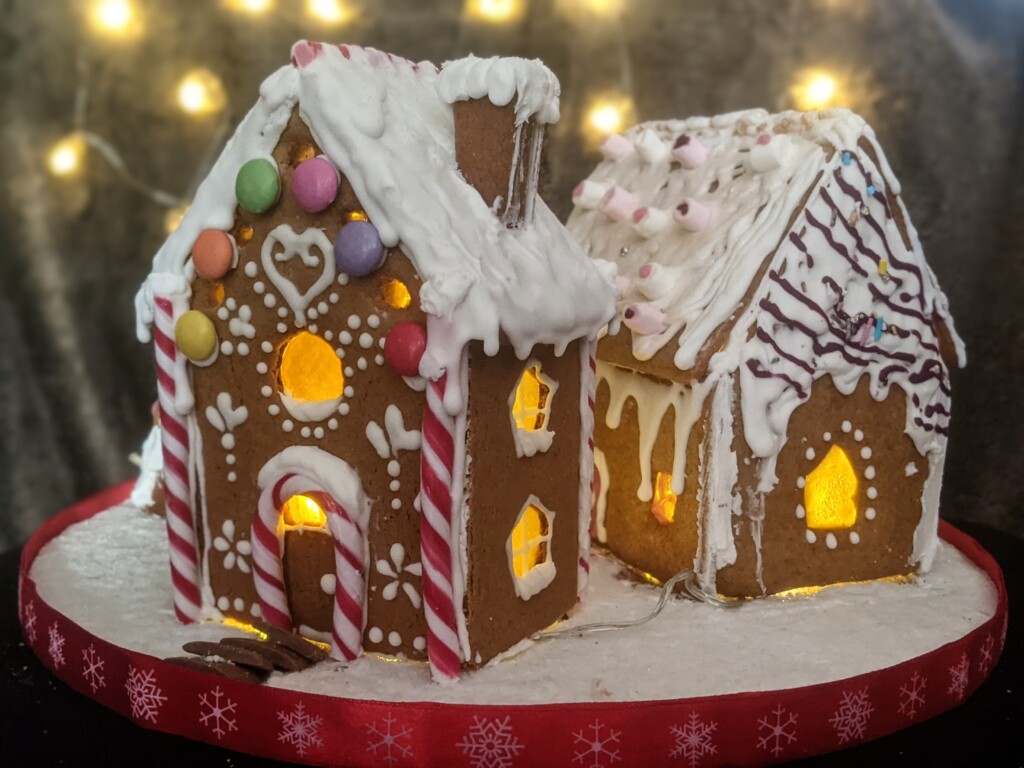
If you can get hold of a cake board, a chopping board, or even the bottom of a cake tin, use it to set up your gingerbread house – you can glue your house to the board for extra stability if you like, and decorate it with extra snow icing for the full winter scene effect!

Remember those lovely stained-glass windows we made earlier? If you decide not to glue your house down to the board, you can set up some little battery operated fairy lights inside the house, and suddenly you’ve upped your gingerbread house game to include a gorgeous, wintery fireplace glow from inside those sweet smelling walls!

9. Get imaginative with your decorating!

This is the fun bit – time to get the icing, sweets, chocolates, and sprinkles out – and don’t hold back! The more colourful the better in my opinion! Use your favourites, and get creative – chocolate buttons or shreddies work great for roof tiles, and candy canes make cute doorways and pillars too!

10. Have fun!

100% without a doubt, the best part of making our gingerbread house every year is the memories that we make, alongside our creations – so above all else, enjoy yourselves and remember – if all else fails and those walls fall apart into a crumbling mess – just throw some of your favourite sweets on it, and eat it anyway!

I hope you’ve found my Top 10 tips for making a Gingerbread House helpful – I’d love to see some of your own wonderful gingerbread houses, so if you’d like to share photos of your own creations, post a photo and tag me on Instagram @bbakeslondon!

Wishing you all a safe and Happy Christmas!
B x

Categories
Design

Top tips for commissioning cake art

You’ve decided that you’d love to order a unique artistic cake for your upcoming event, but you’re not sure how to go about choosing or designing your cake – so what do you do? Luckily, this is exactly what cake designers like myself are here for – but importantly, to create the perfect cake, we need some all important information from you! Read on for my tips on how to successfully commission the perfect bespoke piece of cake art for your celebration.

1. Make it appropriate for your particular event

Is it a small family birthday gathering, or a wedding with 200 guests? Anniversary cake for two, or a large corporate event launch? The type and size of your event will help determine not only the size of your cake, but also the style of cake you order. Size doesn’t have to limit your choices for a cake however – if you want a large statement cake but only have a few guests, your cake art can incorporate dummy tiers or elements made from other delicious edible mediums such as chocolate or Marshmallow & Rice Krispie treats! On the other hand, if your design works best on a small scale but you have many sweet-toothed mouths to feed, you can always order a main feature cake for your event, with additional serving cakes behind the scenes.

2. Choose a subject or theme

Make it relevant or meaningful to the recipient and it’s bound to be a winner. There’s nothing I love more than seeing the reaction to a cake when it’s revealed for the first time, especially when it reflects something personal to the recipient. This might be a favourite movie or TV show, a book that they’ve read a hundred times, their beloved pet, or even their favourite food!

Yes – this is all cake and sugarcraft!

3. Do you want a cake that looks like a cake, or something completely different?

Unique cake art can come in various forms, but my favourite ones to make are my signature styles of either painted cakes, or sculpted cakes. The beauty of a painted cake is that, whilst it maintains the traditional element of a classically shaped cake, it also stands apart from the rest through its bespoke artistic design in hand-painted form. On the other hand, a sculpted cake has the added impact of looking nothing like a cake at all – these cake ‘sculptures’ are always a talking point for their hyper-realism and detail.

4. Decide on your budget.

Ultimately, when you decide to commission a bespoke piece of cake art, you should expect to pay more than you would do for a more traditional cake design, due to the time it takes to design and create, especially if it is a sculpted cake with an internal support structure. Some 3D cakes are feats of engineering! If you have a budget in mind, let your cake designer know from the outset, so that you can be clear from the beginning what type of design is possible within your budget.  

5. Don’t forget the taste!

Whilst your decision to commission an artistic cake may have originated from the desire to have something visually stunning, don’t forget that a cake is there to be eaten – and cutting into your cake art will feel like a complete waste if it doesn’t taste amazing at the end! Your cake maker will have a variety of flavours to choose from – take a look through their menu and choose the flavour (or flavours!) that appeal not only to the recipient, but also to the guests that will be eating it!

Photograph: Will Echols @willecholz

So there you have it – my top tips for commissioning a piece of cake art! If you’re interested in ordering a unique artistic cake for your event and would like to chat through some ideas with me, get in touch and let’s see if we can create some cake magic together!

B x

Categories
Design

Planning a Micro-Wedding?

Weddings may be smaller at the moment, but that doesn’t mean they should be any less special! B Bakes London has partnered with Events with Akilah to create amazing all-inclusive micro wedding packages – read on to learn more… 

But what is a Micro-Wedding?

A Micro Wedding is a wedding ceremony and/or reception with up to 30 guests. As we all are aware, the events of 2020 have meant that celebrations have had to adapt to becoming smaller and more intimate gatherings. However, that’s not to say that Micro Weddings are simply a trend that will disappear post pandemic era. In fact, Micro Weddings are the perfect way to capture the most important aspects of your wedding day, on a smaller, more relaxed and intimate scale. Akilah, of Events with Akilah, sums it up perfectly in her article “London Micro Weddings – What’s the big deal?”. She talks in particular about two benefits to having a Micro Wedding – the first of which is the cost. With a Micro Wedding, it makes it possible to have your dream wedding, on a much smaller scale. What it doesn’t mean is that you have to cut back on the personalised or luxurious finishing touches that will make the day unique and meaningful to the couple – quite the opposite in fact! Keep the themes, décor and aspects of the day that are important to you – a Micro Wedding allows you to keep all the aspects of a traditional wedding day, just scaled back!

Photograph by Tie The Knot Films
But can I still have a statement wedding cake as part of a Micro Wedding?

Absolutely! The beauty of a Micro Wedding is that you’re not compromising on the aspects of your day that are important to you – so you can still get that centrepiece wedding cake you always dreamt of! The beauty of artistic cakes is that it can still make an impact, even as a smaller scale cake. Small cakes can still pack a punch when it comes to making a statement! Alternatively, I can incorporate dummy tiers, such as in the cake above, which allows you to achieve the show-stopping look of a larger tiered cake, without the waste of uneaten cake. On the other hand, you may choose to go for a larger cake after all – because what would be better for sweetening up those uninvited guests than a slice of delicious leftover wedding cake!

Check out Akilah’s great feature on what I can offer as a recommended supplier, alongside a host of other brilliant suppliers, as part of her All-Inclusive wedding packages. Take a look at our promotional video below to see just how stunning your Micro-wedding could be. And if you’d like to chat more about wedding cakes, please get in touch – I’d love to hear from you!

B x

Video courtesy of Tie The Knot Films

Categories
Design

Welcome!

Hi, and welcome to the brand new website and blog for B Bakes London Cake Studio!

I’m Brinda, the owner and cake artist behind B Bakes London. I live in South East London, with my family of expert cake tasters – my husband and two daughters! 

What’s the backstory to my cake business?

I fell in love with baking in my 20’s (back when I could eat a ridiculous amount of anything chocolate, and it wouldn’t add an ounce onto my waistline!). But it wasn’t until my daughter’s 1st birthday that I tried creating my first decorated cake. It took me about a month to make all those little edible decorations, and I was up until 3am the night before the party trying to get it looking perfect – it was wonky, messy, made with love and I adored it! As the years went on, the cakes became increasingly ambitious, and before I knew it friends were convincing me to go out there and make a business from my newfound hobby! It seemed ridiculous to me at the time, but I gave it a go – and before I knew it, B Bakes London was born!

So that’s how I became a cake designer! But what does it mean to be a cake artist?

My absolute favourite cakes to make are those that really let me flex my inner artist – I’ve always had a childhood passion for art that’s never left me, but until recently, this was always pushed to the side as the hobby I never really had time to indulge in. Now, I get to make a living out of creating edible artwork, and I couldn’t be happier! I love that I can push the boundaries between cake and art, to create something truly unique and memorable for my clients. Every cake I design pushes me to think outside the box of what a cake ‘should’ be, to create a unique, bespoke centrepiece that gets people talking – just as all art should! 

How would I sum up my cakes in three words?

Innovative, fun, and delicious!

If you’d like to see more of the type of cake art I love to create, or are interested in having something special created for your event, head over to my gallery, have a nosey around, and then get in touch – I’d love to hear from you!

See you soon, B x